
The other side may have been worse…here is a blown-out fix from many years ago on the rear passenger side: non-matching black paint, no topcoat, hard tape line, rumply body fill, rusted out from the back. I have already redone the driver side, and had a learning curve over there on blending the body work (no skin coat, so still lumpy) and painting (too thin on my layers, so there is crackle).
In May, while waiting to install the Ibis, I decided it was past time for the Subaru to get a do-over for my old attempts at rust fixes. She turned 20 this year, meaning she is now a “Classic Car”. She is the same age as the Mustang was when I was in High School, which seemed old to me then, but now 20 seems pretty dang new as the pony car is an “Antique” at 54. E is the car’s second owner as of 2006, the car’s first owner drove it up and down Parley’s Canyon (I-80 to Park City) daily, and she has driven it to work in Kansas and here for 12 years. So it is peppered with rock chips and well salted, plus it was not garaged and tree sap and bird-poo took a toll. I did quite a bit of online diy tutorials, and each car panel that I dealt with improved. By my last fix I wanted to go back and redo my first fix, but there are still more fixes to go…
Doing it right requires removing the wheels and grinding out the dead metal inside the wheel well and out, then sandblasting, then rebuilding the surface. I decided to go with the POR-15 system to seal and rebuild. POR-15 requires chemically etching the metal to cure the surface and allow the polymer coating to adhere to a chemically altered steel surface. This is the best method for keeping rust from returning, and the rather lengthy and problematic process dovetailed with my patina work on bronze- the logic behind it is much stronger than other systems. The polymer surface can be painted with other matching polymers from the POR-15 catalogue, and recently they added a primer coat that allows body paint. So I ordered in the matching Subaru pearl black and clearcoat.

Look for a daily-driver Suby from the 90’s, and you’ll probably see this wheel-well issue.

This little spot at the front of the panel goes under the trim, and well back into the wheel well. Still a learning curve on this side, but much improved from the driver’s side. I have all the finished pictures at the end of the post…

This is my first run at the whole system, the finished drivers side, an embarrassment aesthetically, but solid on the rust triage. The entire inside of the wheel well is now POR-15 to metal, with their rubberized coating as an over-layer. All the body work is done with a polymer putty that does not absorb moisture like a paste i.e. Bondo. Figuring all that out is part of the bad surfacing, and the rest is just gaining experience.

Other than the lumpy triage, the paint line shows because I did not go heavy enough with my color layers and should have done more clear coat layers. Sanding and buffing thin paint exposed all these issues and more (crackle), and I had no choice but to leave it alone or make it worse. I found better instructors online, and tried to trouble-shoot and change things up. (see the little spot of rust below the tail light? got that seamlessly on the next round.)

After I thought I’d fixed the area, this original paint shattered off of the car due to my use of wood shims to hold the rubber trim out from the panel. I used foam shims from then on- a suggestion of Elizabeth’s!

The windshield is to the L, and had a lot of rust along and under the rubber seal to the windshield (yellow tape marks the worst of them). Many rock chips had blossomed much more widely than it seemed from the dimples in the paint. Once I started grinding them out, I saw that the triage was going to be vast. The marks along the rest of the roof and sunroof are from bird poops. Bird poo is like Alien blood, it etches in and burns through to the metal.

Another view of the windshield roof line, the pink and black area under the yellow tape has been etched and is turning the metal peacock and the rust to black.

This was a dimple of damage from bird poo that erupted under the paint. Now etched and ready for polymer.

The rubber windshield barrier is lifted with foam shims made from our work-out mat. This will take a few days of curing the polymer, and moving the shims for new polymer. All the black is the polymer, and the white rings around it is the car’s primer coat.

The polymer is a brush-on, and needs a bit of sanding after it cures. It cures nearly as hard as metal, and much harder than the auto-paint, which makes sanding it a problem.

These are nearly all of the bird poos. I thought I’d do them first. Taped off and the car bagged out in plastic.

I had this idea…direct the spray paint in a smaller area. It worked well at first, but loaded up with runny paint and had to be tossed. While it worked it was pretty trick- but burned through the paint as well.

Three layers of POR-15 primer coat, with some soft and hard edges to blend out.

This is what the tube allowed- focused spray layer out to a dusting allowing a hard tape line thin enough to sand out after peeling back the tape.

Sanded smooth and ready for new tape.

The black under the clear-coat is the POR-15 bulge- and the trouble I had sanding it flat before the primer coat. Anything you don’t get perfect always shows up on the next layer, or the next.

I use a thin frog tape to minimize my paint lines. I’ll be wetsanding the entire roof, as it is in pretty rough shape, and hope I can blend it all.

Tape removed and the topcoat will cure for two days at least before wet sanding. I’m getting braver about sanding the car and will sand the entire band between the windshield and the sunroof, and paint and clear coat the entire portion.

After rough-sanding with 600 grit, I have to primer coat the POR-15 so it can accept auto paint.

I include the worst corner of the sunroof as well, and spray it on in three layers creating fairly heavy tape lines.

The heavier primer layer allows me to smooth out bumpy issues with the POR-15 with more wet-sanding.

4 layers of color coat and 5 layers of clear coat. Set to cure.

This run of door panel was a mess, and I included it as well.

With sanding, the matte finish of the clear coat will go shiny and I hope it will blend.

While I’m waiting for the roof to cure, I fix deep scratches on each panel bordering the trunk. I think the original owners put a tie-down ski rack on the car. This side came out flawlessly (it was in line with the blue reflection).

This side was my first attempt, and still shows some damage. However the mirror-level reflection of the wet sanding corrected the slight permutations in the original paint.

Here is the area between the windshield and the sunroof, sanded and buffed out.

I pulled a dent out of the front quarter panel that had popped off the orange running light, then did a little skin coat to correct. Could have done a few more skin layers, but it blends…

This is the rear panel I started with, that has the issues. From a step away they blend in.
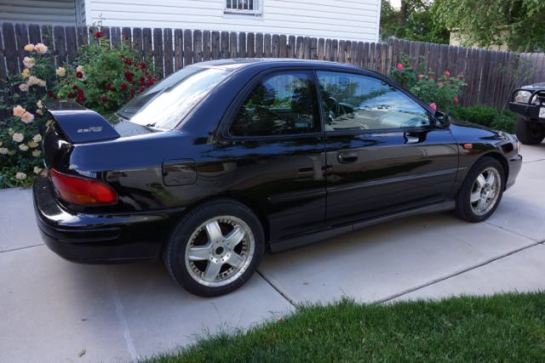
This is the improved technique on the passenger side rear wheel well- from a step away.

Here is the much better body work- this angle gives a clear unblemished line over the fender. The paint is layered much better and blended nicely compared to the other side.

The windshield is to the R, the clouds reflect on the roofline. You can see a few areas of the POR-15 near the rubber border that I could not sand down perfectly without ruining the rubber (or removing the windshield).

Here is the rest of the roof. Some areas blended in perfectly, and others remained a bit hazy- this is from my spray paint having a bit of orange-peel, and not wanting to strip through the original clear-coat. So I backed off on perfection and accepted it as markedly better.

This is a bird poo on the trunk that spanned the seam line. I wet sanded on the L side of the seam and just buffed on the R side. The wet sand removed it. The original clear coat is not at all consistent across panels and pillars, I burned through in one small spot on a pillar and so take a lot of “fixables” as fixed problems to allow.

This is the drivers rear wheel panel again, showing that the earlier image discussing how bad it is may not be quite as bad- as that image captured it at its very worst angle.

Inside the trunk is also all new. There was an issue with the drain plug under the spare tire that led to a long triage with POR-15, rubber coating, and creating a new cover panel for the spare to match the old water damaged one, new carpet, and a sound baffle. And now you can open it with the key again. Plus new speakers.

Black Paint is the hardest to work with, of course, but there were other issues as well. LIke the strip-down & re-seam of the bottom area of the passenger door with POR-15, and repaint. Two dings in the windshield are also fixed, along with a hole in each foglight. I sanded and repainted the SUBARU lettering on the rear panel, all silver again. Fixed a cracked headlight. Used glass compounding with the buffer to remove most of the skids from the power window on the driver’s side. Used a special liquid to renew the rubber seals and hood scoop. Wet sanded some panels with my buffer, and used a “deep cut” pad and cutting gel to remove 20 years of swirls and dings, then moved to a less aggressive shining gel, then wax and polish. From here you can’t even see all the work I still have to do on the hood. A week later I thought I’d clean and lube the sunroof, as it can be a bit sticky and slow. It had rust along the rail seam to the inside of the headliner on both sides, and along the front wall. All this was ground out and POR-15ed, plus I had to rebuild some of the worst rust rotted areas with fiberglass and POR15. As long as I was at it I ground down the bottom of the driver side door, which had rusted a bit, and POR15ed it as well. Then I ground down the peeling paint on the rear window’s aluminum stripping, and POR15, then painted a POR15 rubber coating to blend the bracketing seals and the AL stripping. Also stripped and repainted the windshield wiper arms. All the metal dust and rust dust meant washing the car and detailing the interior again. At some point I’ll get on to basic rock-chip repair…
